


Here I am, up at 1 am, surrounded by not one, not two, but FOUR different types of cookies around me! Yes!!! I have finally taken this seriously & I'm testing recipes every spare minute I can find, which with work, gym & a social life is almost impossible! So it's the sleep that's getting sacrificed, and honestly, I'm loving every minute of it. Being so busy that you end up collapsing in bed is my form of bliss!
After spending the last two hours researching the ratios & hows & whys of chewy caramel (to use in caramel stuffed cookies), I finally remembered this post that has been pending for 4+ months! I made this cake in one of my random bursts of inspiration & craving. The recipe was actually bookmarked long ago, and my team at work was constantly asking for something after discovering the blog, which is actually kept quite a secret because the follow up question is always - WHY DON'T YOU BAKE ANYMORE??
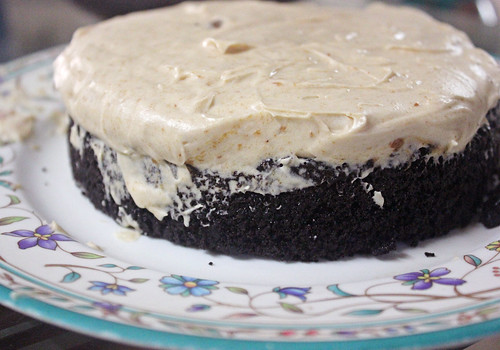
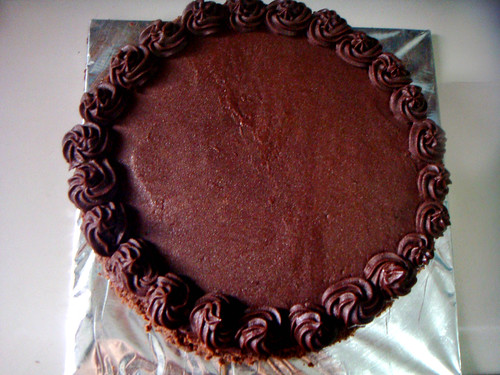
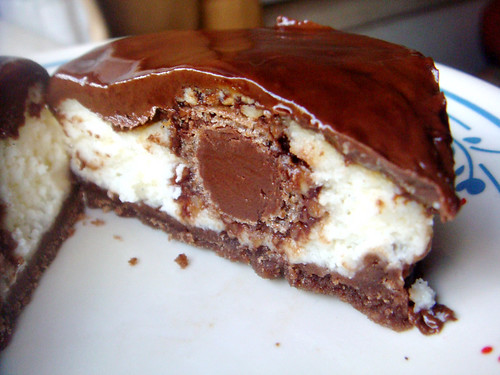
But one day - maybe I was feeling generous - I decided to do as they wanted & make an indulgent, rich & sinful cake. This cake just went on to prove how much I actually love just stepping into a kitchen & coming out with a delicious plate of trouble in a few hours. I don't know which was more fun, the cake making process, or the happiness when I saw the smiles on the people who ate it, or the taste of the cake itself! The cake is light yet full of chocolatey goodness, and the salted caramel buttercream is something you'd want to take a long bath in, it's that rich while still tasting smooth and dream like. Top it off with a simple chocolate fudge frosting, and you've got heaven on a plate, just like that!
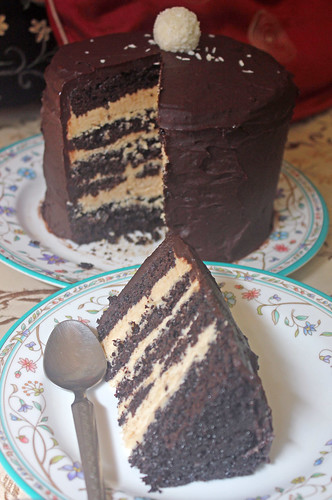
Chocolate Fudge Cake with Salted Caramel Buttercream
Recipe from Martha Stewart via Sweetapolita
Yield: Three 6-inch round layers
Serves: 8+
Ingredients
1 1/2 cups (180 g) all-purpose flour
1 1/2 cups (300 g) sugar
3/4 cup (90 g) dark unsweetened cocoa powder
1 1/2 tsp baking soda
1 tsp baking powder
1 tsp salt
1/4 cup (60 ml) vegetable oil
3/4 cup (190 ml) buttermilk
3/4 cup (190 ml) hot brewed coffee
2 eggs, room temperature, lightly beaten
2 tsp vanilla
Instructions:
- Preheat oven to 350° F (180°C). Grease & line three 6-inch round cake pans with parchment paper.
- In the large bowl of your electric mixer, sift together all the dry ingredients. Add all the remaining ingredients and beat until just mixed. The batter will be quite liquidy.
- Pour into prepared pans and bake for 30 minutes, until a skewer inserted comes out clean and the top feels springy to the touch
- Cool to room temperature on wire racks. Refrigerate until ready to assemble.
Yield: 4 cups - You may be leftover with approximately 1/2 cup
Ingredients
1 cup (200 g) sugar
1/4 cup (60 ml) water
1/4 cup (60 ml) heavy cream
generous pinch of sea salt
1 1/2 cups (3 sticks / 340 g / 12 oz) unsalted butter, at room temperature
4 large egg white
1 tsp pure vanilla extract
Instructions:
- First, we have to make the salted caramel to cool and keep aside, ready to add into the buttercream
- In a medium saucepan, mix together 1/2 cup + 2 tbsp (130 g) of the sugar with the water. Boil over medium heat. Brush down the sides of the saucepan with a dampened pastry brush to prevent crystallization. Don't stir the mixture at all from now on, you can however, gently swirl, occasionally.
- Remove from heat and carefully add the cream, whisking until smooth. Be careful of the sputtering. Whisk in the sea salt & vanilla, set aside to cool.
- Now it's time to make the buttercream. In the large bowl of your mixer, beat cubes of the butter until pale & fluffy, about 3-5 minutes.
- In a clean bowl, combine the egg whites & sugar. Place bowl over simmering water, whisking occasionally until the sugar dissolves, reaches 160° on a candy thermometer and the mixture doesn't feel gritty when rubbed between two fingers.
- Remove the bowl from the heat and whisk on medium speed for about 5 minutes. Increase the speed and whisk until stiff peaks form, about 5-6 minutes. The bowl should now be at room temperature. Reduce the speed to medium-low, and add in the beaten butter, one cup at a time, whisking between each addition.
- Using the flat beater, add the cooled caramel, beating until smooth, about 3-5 minutes.
- Your buttercream is ready :) Store in the fridge until ready to use.
For the Dark Chocolate Fudge Frosting
Yield: ~5 cups - You will be leftover with approximately 1.5 cups
Ingredients
1/4 cup + 2 tbsp (45 g) unsweetened Dutch-process cocoa powder
1/4 cup + 2 tbsp (90 ml) boiling water
1 1/2 cups (3 sticks / 339 g /12 oz) unsalted butter, room temperature
1/2 cup (63 g) confectioners’ sugar
pinch of salt
1 pound (454 g/16 oz) good-quality semi-sweet chocolate, melted and cooled
Method:
- In a small bowl, combine together the cocoa powder & the boiling water, stirring until the cocoa has dissolved
- In a large bowl, beat together the butter, sugar & salt using a flat beater, until pale & fluffy - about 5 minutes
- Reduce speed to medium-low and add the melted chocolate, beating until combined. Add in the cocoa mixture and beat until well incorporated.
To assemble:
- Split the layers into halves. Lay the bottom half of a layer onto a cake plate/board. Lay strips of parchment along the sides of the cake to ensure an easy clean up.
- Scoop out about 1/5th of the filling onto the cake layer. Flatten out using an offset spatula. Add another cake layer on top and repeat the process until you have laid out all six layers. Ensure the top layer is the inverted bottom of one of the three cakes, to get a perfectly flat top.
- Crumb coat with a light layer of the dark chocolate fudge frosting. Refrigerate.
- Now ice the sides & top of the cake with the frosting - an offset spatula
, a straight spatula
& a bench scraper
are your best friends during this, as is a good turntable - I use something similar to this
.
- Lay on your preferred candy of decoration (I used a Ferrero Raffaello
)
- Serve at room temperature